Thursday, November 14, 2013

On the film set

Haven't done a post forever, so I thought some recent photos would be good to post.

The jeep was used on a film set recently for a 3rd "Saints and Soldiers" film. Here are a few pictures from the set. The first one was taken by the production. That's me on the far right:


And just for kicks, here is the recently released teaser for the film. The jeep didn't make the teaser, but I did as a German soldier at 0:26:


Monday, July 29, 2013

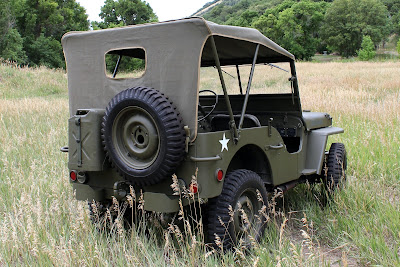
IT IS DONE!!!!

After all the work that has been done, I'm considering the restoration process completed and the jeep is DONE!! There are still a few small things that need to be dealt with (does it ever end?) but for the most part, all the components are there and all the painting is finished, so I am declaring this restoration done!

Yes, I did the restoration myself, but there are many people who helped out and I seriously couldn't have done this (and wouldn't have done this) without them! I know this is sappy, but I really feel like there are a few people I need (and want) to thank (in no particular order):
  • Ray M. - my friend and jeep guru for his infinite jeep knowledge who coached me through this (and was sometimes my therapist) and helped me find the best solutions for my jeep.
  • Roger C. - the man who can fix and restore anything for his unparalleled knowledge and experience (that's seriously not an exaggeration) of how WWII military vehicles work. When I couldn't fix something, he could do it while blindfolded, underwater, and with one hand tied behind his back!
  • My Dad - He was often more excited about this project than I was. There are many things that I simply couldn't have done and/or would have taken 4 times longer without his help. Our jeep building marathon got the jeep going on the 4th of July!
  • My Wife - for agreeing to keep this former piece-of-junk in the garage and putting up with my long hours spent working in the garage. Also, now that it's done, thanks to her for loving to go on a jeep ride together!
  • Many others: My Mom, Paul D., Keith R., Terry H., Gary L., the rest of my family (and my wife's), friends, neighbors - all who helped in one way or another, even just by being interested, that made this project do-able.
OK, now that that's over here are the photos! I took the jeep up the canyon for a photo shoot and here they are:


Friday, July 19, 2013

Details, details...

Now that the jeep runs and drives, most of what is left to do is just the details. I've added a few details over the past week that add to the look of the jeep: rear reflectors, data plates on the glove box door and the latches on the hood. I also have the stencils for the registration number on the hood so I'm thinking that might be next!


Saturday, July 13, 2013

First Drive Away From Home!

Took the jeep out on an excursion today! I got enough of the bugs worked out to where I felt confident enough to venture more than a few blocks away from home. 

One bug I dealt with was a temperature issue - it seemed the jeep wanted to run at right around 200 degrees, which I wasn't comfortable with (current outside temperatures here easily reach 95-100 degrees F). I installed a new thermostat rated for 160 degrees and it instantly brought the running temperature down to 175-180 degrees. Much better! The floor was getting hot! 

Anyway, with that solved, I met up with my friend Lile in his Ford GPW (also a WWII jeep) and we headed up the canyon. Here are a few pictures and a short video I took on the way:

Jeeps at the turn-around point (mine in front).
Photo-op in the forest.


Here's a short video shot from my phone while driving with Lile following behind in his GPW:


Thursday, July 11, 2013

Markings added

Today I started to add the military markings that would have been on the jeep. I started with the stars on either rear corner. I took a few photos to show how I did this:

First, used a 6-inch star cut out from paper to mark the points of the star, and then connected the points with painter's tape and cut out the tape from the inside with an x-acto knife and a straightedge.


Next, added more tape and newspaper to catch the over-spray:


Hit it with some flat white paint,


then remove the tape and newspaper, and there it is! No stencils needed!


Friday, July 5, 2013

It runs!!

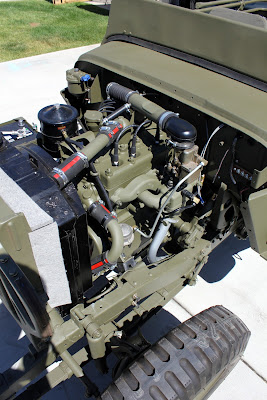
The 4th of July now marks an important date for my jeep restoration - the day that I took it on its first drive! Dad was here again and we put in 3 solid days of at least 12 hours each day working on the jeep. It took us a while to get the engine going as it would only fire up temporarily by pouring gas directly down the carburetor. Finally, after a new fuel pump and after bypassing the fuel strainer, the engine easily took off on its own and ran beautifully. Here's a shot of the engine and the temporary fuel line/filter arrangement:


With the engine running, my eagerness to drive the jeep was suddenly derailed when we had a mishap with the clutch fork and I spent nearly 3 hours trying to get it back in place. When I finally got it, I took the jeep on its first spin around the block at about 12:30 AM (with no headlights!) 

Here is the jeep as it looks today - looking pretty complete but with small details still to go on. Will post video of the engine running and of driving the jeep soon!


Friday, June 28, 2013

Getting closer...

The jeep is really starting to take shape now and my parts boxes are getting smaller! I don't have anything really monumental to show, but wanted to post an update of progress so far. Most engine accessories are mounted, just some more electrical to do and fuel lines. Glass is on order and will be here next week. Body still needs a final fitting with the fenders and grill but should only need to be bumped around 1/4 inch or less here and there. It's hard not to want to just put in the key and take it for a drive!


Monday, June 24, 2013

Engine Installed

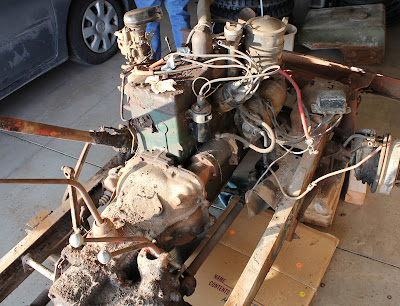
I picked up my rebuilt transmission on Saturday, so we promptly put it on the engine along with the transfer case and set the assembly down in the frame. Dad has been here and we've been working on installing a lot of other small components on the tub and doing some wiring. Here are some shots of the engine installation and the jeep with the power plant in place with some before/after pics. Tub placement on the chassis coming very soon!


Monday, June 17, 2013

Painted Tub

Just wanted to post a couple pictures of the tub out in the sunlight. I was a bit nervous to roll the tub out in the sun as the lighting in the garage isn't the best and can hide unpainted spots. Nothing can hide out in the sun. I was very happy to see that the tub looked great in the sun and I only had to touch up a few small areas with the spray can.


Yes, I can see that red spot in the fuel tank sump... :)